
You did the hard part: the page is useful, current, and ready to earn attention. Then Google surfaces a generic thumbnail, crops out the subject, or gives the URL Search visibility without any meaningful Discover exposure. Those outcomes can have different causes, so adding one more tag isn’t a complete diagnosis.
Your job is to make the page suitable for the surface, give Google consistent image signals, and make the people and publisher behind the content easy to verify. This workflow shows you where to start, what to implement, and what not to blame when Discover traffic moves.
Treat Search and Discover as different outcomes
Google Search responds to an expressed need. A person types a query, and your page competes to answer it. Discover works ahead of the query. It tries to predict what a person will want to see from their interests and recent context.
That difference changes the publishing decision. A durable tutorial may deserve a Search-first brief even if it never becomes a meaningful Discover story. A timely development with a compelling visual and a clear connection to your audience may be suitable for both. Timeliness, relevance, and publisher authority tend to matter heavily in Discover, while evergreen content appears less often.
Classify the page before you optimize it:
- Search-first: The page answers a durable question or helps someone complete a task. Build it for sustained usefulness and treat Discover exposure as an upside, not the forecast.
- Discover candidate: The subject is timely, closely connected to your audience’s interests, and supported by an image that can carry the story in a visual feed.
- Dual-purpose: The topic has immediate relevance but also resolves a query people will continue to search. Preserve the useful answer instead of forcing the entire page into a short-lived news angle.
This classification prevents a common strategic error: treating every lack of Discover traffic as a technical failure. Discover isn’t a dependable fit for every brand or every page. Technical readiness can make a suitable page eligible for stronger presentation, but it cannot create audience interest that the subject does not have.
Align the thumbnail signals in the rendered page

Google does not promise to use the image you nominate. Image-preview selection is automated and can draw on several sources, including page content, structured data, and Open Graph metadata. The practical goal is therefore not to force a thumbnail. It is to remove contradictory signals.
Use this implementation sequence on every content template that can appear in Search or Discover:
- Choose one preferred image. It should represent the specific page, not merely the publisher, section, or general subject area.
- Declare it in Schema.org markup. Use
primaryImageOfPagewith either the image URL or anImageObject. Where your schema model describes a main entity, the image can also be connected through the relevantmainEntityormainEntityOfPagerelationship. - Set the same asset as
og:image. Do not let an SEO plugin, social plugin, and theme independently emit different preferred images. - Permit large previews. For a non-AMP implementation, the rendered robots directive should include
max-image-preview:large. A typical output is<meta name="robots" content="max-image-preview:large">. - Inspect the final rendered page. Verify the HTML and JSON-LD that Google can receive, not just the image selected in the CMS editor.
The rendered-page check catches the failures that configuration screens hide. A template may retain an old og:image, fall back to a logo when a field is empty, omit structured data on one content type, or output a restrictive image-preview directive. The image URL must also resolve to the intended file in production. A perfectly configured CMS field has no value if the resulting URL is broken or points to a placeholder.
Pay particular attention to disagreement. If primaryImageOfPage identifies the hero image while og:image identifies a logo, you have given an automated system two different answers. Using both forms of metadata is useful when they reinforce the same decision; duplicating fields without aligning them only multiplies ambiguity.
The max-image-preview:large directive deserves equally careful language. It allows Google to consider a large preview; it does not guarantee that a large image will appear, that your nominated asset will be selected, or that the page will enter Discover. Think of it as permission, not a ranking command.
Build the image for the crop, not only the page
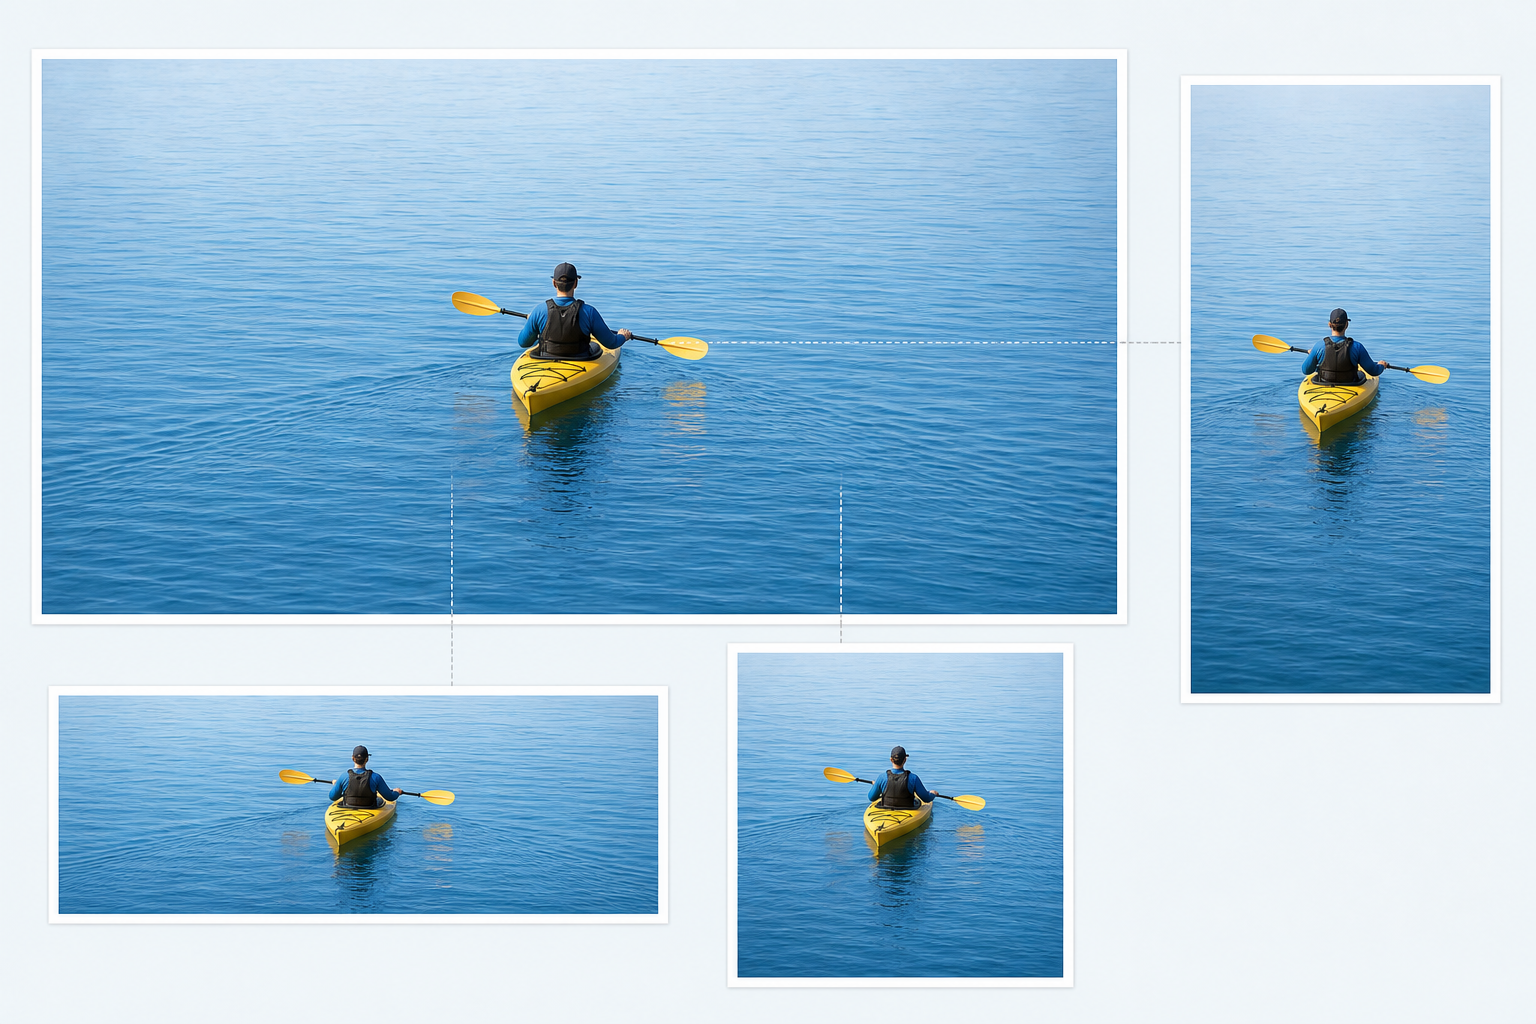
An image can look excellent at the top of an article and still fail inside a feed card. Discover may crop the asset for its layout, so the page-level composition is only half the job. A strong Discover candidate is at least 1,200 pixels wide, high resolution, and suited to a 16:9 landscape presentation.
Use an asset-level publishing checklist:
- Make the image specific. A real product, person, place, event, or visual result is more informative than a generic thematic image.
- Avoid logos as the editorial thumbnail. The image should explain what this page is about, not simply identify who published it.
- Keep essential detail away from fragile edges. Place the focal subject so it remains understandable after a landscape crop.
- Avoid embedding the headline in the image. Text can become illegible or disappear when the asset is cropped and reduced.
- Avoid extreme aspect ratios. A very tall or unusually wide source makes useful automatic cropping harder.
- Keep the file visually sharp. Compression should not leave faces, products, screenshots, or other critical details soft at card size.
Check the crop before publishing
Start with the actual image URL emitted in og:image, not the larger file you happen to have in the media library. Preview it in a 16:9 landscape frame. Then reduce the preview until it resembles a feed card and ask a blunt question: can someone still tell what happened or what the page covers without reading embedded text?
If the answer is no, change the composition or supply a deliberately cropped landscape asset. Google attempts to crop images automatically, but automatic cropping cannot recover a subject that occupies a narrow edge or make a generic image more relevant. When you provide your own crop, use it consistently in the page’s preferred-image metadata.
This is also where editorial and technical teams need a shared definition of done. The image is not finished when it has been uploaded. It is finished when the correct file is visible, large-preview permission is present, the metadata fields agree, and the landscape crop still communicates the subject.
Make the publisher and author easy to verify
Discover optimization extends beyond the individual URL. Google can represent a publisher through a profile associated with the entity’s Knowledge Graph identity. That publisher profile can connect the website with its social profiles, so inconsistent names, outdated handles, and incomplete identity information deserve attention.
Audit the publisher as a person encountering the brand for the first time:
- Use a consistent publisher name, identity, and website across the site and official social profiles.
- Check whether the Discover publisher profile accurately represents the organization and includes the intended social handles.
- Keep the About page easy to find and specific about ownership, editorial purpose, and the people responsible for the site.
- Link relevant editorial, correction, privacy, and other policy pages from predictable locations.
- Ensure structured data agrees with the information a reader can see. Markup should clarify a real identity, not introduce a separate version of it.
Profile corrections may require manual updates and patience. That makes prevention more valuable than repeatedly repairing mismatches. Decide on the canonical publisher name and official profiles, then use them consistently whenever you launch a new template, section, or social account.
Apply the same transparency standard to authors. Visible author photos, biographies, and relevant social links support clearer authorship. A strong implementation gives each article a real byline, links that byline to a useful author page, and explains why that person is qualified to cover the subject.
Do not turn this into decorative credential stuffing. The author page should help a reader answer practical questions: Who wrote this? What area do they cover? Is their work on this site accessible? Can their public identity be verified? If those answers are missing from the visible site, adding more structured data will not repair the underlying transparency problem.
Diagnose weak Discover performance in the right order
Technical fixes are attractive because they are concrete. They are also easy to over-credit. Content relevance and quality remain more important than technical polish. A technically perfect page can still be a poor Discover candidate, while an appropriate page can underperform because its template suppresses large images or emits the wrong thumbnail.
The feed itself is not static. Social posts and AI-generated summaries can occupy space that previously went to conventional publisher pages. That means a broad decline does not, by itself, prove that a developer broke the site. Use this order of investigation:
- Recheck content fit. Was the page genuinely timely and relevant to an established audience, or was Discover traffic assumed simply because the page was new?
- Determine the scope. Separate a page-level issue from a content-type, template, section, or sitewide pattern.
- Inspect the rendered metadata. Compare
primaryImageOfPage, entity relationships,og:image, and the robots image-preview directive. - Inspect the emitted asset. Confirm its width, quality, subject, aspect ratio, and crop resilience.
- Review publisher and author transparency. Check profiles, bylines, biographies, About information, policy pages, and consistency between visible information and structured data.
- Revisit the expectation. If the implementation is clean, the remaining issue may be content suitability, audience interest, authority, or changing competition within the feed.
The following symptoms are useful starting points, not proof of a single cause:
| What you notice | Check first | What not to assume |
|---|---|---|
| Large previews are absent across one content template | The rendered max-image-preview:large directive and template-level image fields | That every affected page has weak content |
| Search and Discover surface an unintended image | Agreement between primaryImageOfPage, entity relationships, og:image, and the visible hero image | That adding another duplicate image field will force the selection |
| The metadata is clean, but a durable evergreen page receives no Discover exposure | Whether the subject is timely and aligned with audience interests | That valid markup creates Discover demand |
| Traffic declines broadly without a relevant site release | Recent content mix, audience relevance, publisher authority, and changing feed competition | That a technical regression is the only possible explanation |
| Only some authors or sections perform inconsistently | Template output, byline links, author pages, preferred images, and section-specific defaults | That the entire domain needs to be rebuilt |
Key takeaways
- Decide whether each page is Search-first, Discover-suitable, or useful for both before setting traffic expectations.
- Point Schema.org image properties and
og:imageto the same relevant, high-quality asset. - Use an image at least 1,200 pixels wide and prepare it for a 16:9 landscape crop.
- Enable
max-image-preview:largewhen you want a non-AMP page to be eligible for a large preview. - Make publisher and author identities visible, consistent, and supported by useful profile and policy pages.
- Investigate content fit before treating every Discover decline as a technical defect.
Choose one recent URL that you genuinely expect Discover to carry. Inspect its rendered head, follow every preferred-image reference to the live asset, test the landscape crop, and then follow the publisher and author paths as a reader would. Fix any template-level inconsistency before producing more candidates. Once those signals agree, you can make the next publishing decision around the subject and audience instead of gambling on metadata.
References
- Search Engine Land — Google uses both Schema.org markup and og:image meta tag for thumbnails in Google Search and Discover
- Search Engine Land — Google Discover technical fixes
Leave a Reply